
Brake Technical Manual
|
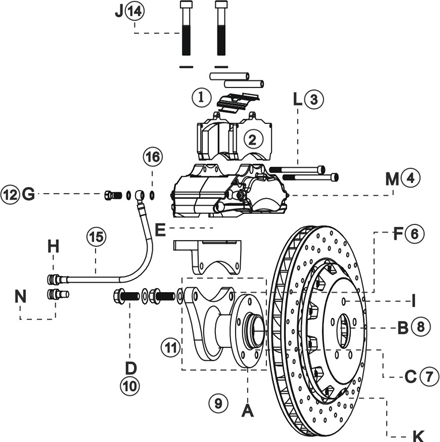
ANTI-RATTLE CLIP
|
1
|
|
BRAKE PAD
|
2
|
|
PAD RETAINER BOLT
|
3
|
|
BLEED NIPPLES
|
4
|
|
CALIPER MOUNTING BRACKET
|
5
|
|
OE CALIPER MOUNTING BRACKET
|
6
|
|
BRAKE DISC MOUNTING
|
7
|
|
BRAKE DISC
|
8
|
|
HUB
|
9
|
|
CALIPER MTG BOLT
|
10
|
|
WASHER
|
11
|
|
BANJO
|
12
|
|
BRAKE CALIPER
|
13
|
|
CALIPER MTG BOLT
|
14
|
|
BRAKE HYDRAULIC HOSE
|
15
|
|
GASKET
|
16
|
Product Description
When getting this production, please read this description as follows:
- Kits include:
a.
2 X Brake calipers with either4/6/8 pot (pistons) b.2 X Brake discs c.2 X Caliper mounting brackets d.4 X Brake pads e.2 X Brake hydraulic hoses f.1 X Workbag g.1 X Brochure - When opening the box, please note and see if there are any parts (a-f) missing. If you have those problems above, please feel free to contact your retailer immediately.
- Before fitting the brake system, a. you have to make sure the PCD of brake disc and the PCD of your OE brake disc mounting are the same. (pic I) b. ensure the central hole of the brake disc and the OE brake disc mounting central are matched. (pic B and pic C)(It is a very important step because we do not have the fittings to fix the rotor likes the original.) c. you have to check that the size of the caliper mounting and the OE bracket mounting. (pic F) d.you have to make sure the size of the brake hydraulic hose joint connecting to your vehicle is the same as the original joint. If not, you have to fit on the adapter for the hose joint. (pic H). Normally, the supplied brake hydraulic hose length is longer.
- Please absolutely verify each step mentioned above then fit the brake system. Returning the goods is unacceptable once the brake system has been fitted to the vehicle or any scratches on the goods are found.
- Upon fitting the brake system correctly, you have to run your vehicle around 10 to 20KM. Please note and see and hear if there is any unusual noise and/or vibration. Please check that all bolts are tightened.
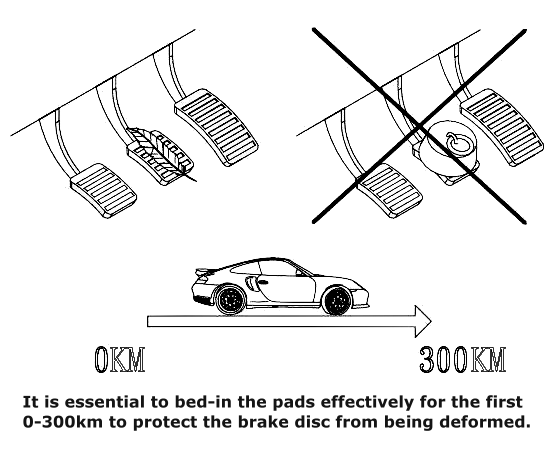
- It is important that new discs and pads are allowed to bed properly for around 300 to 400KM, during bedding period you should avoid excessive or hard braking, as this may cause overheating and/or warping of the discs which will seriously affect braking performance.
- The product is meant to increase braking performance. In order to obtain optimum performance, our brake pads and brake discs are made from particularly rigid material. It is common for a weak squeal of brakes and this will void the warranty.
- The brake system is the most important safety system in your car, hence any brake modifications must be carried out by licensed and experienced mechanics during the installation of the brake system.
- The installation should only be performed by an experienced or a qualified mechanic. We assumes no responsibility for accidents, damage, injuries or death caused by this product directly or indirectly under no circumstances as this is a performance and racing product, and the installer should take whole responsibility for proper installation of this product.
- The fitting methods of brake hydraulic hoses may vary on each vehicle. The technician has to make sure of the angle and the position of the brake hoses then turn the steering wheel at its full range of movement to ensure the brake hydraulic hose won't be affected and be damaged by your tires. You should fit the brake hydraulic hose by approved methods.
- Fitting the brake caliper, please note that the bleed nipple (pic M) should be upturned. Please remember the air in the brake fluid should absolutely exhausted.
- It is recommended that the new brake pads and the brake disc should be the same specification when replacing the worn ones to avoid any damage caused.
- You can choose the same specifications of components from other manufacturers, such as AP, FERODO, MINTEX, CARBON METALLIC.... The warranty is invalid if disc is worn out.
- Our discs are all tested by advanced balance machine. Normally, there are some turning on the discs. You cannot drill a hole and/or turn brake disc to prevent the brake disc being out of the balance.
- OE hub of each vehicle has tolerances during production (pic F). When the caliper cannot realign to the central position, modification of the axle hub might be made.
- 99% of brake hydraulic hose joints connecting to the vehicle are either raised-type or concave-type (pic H). If you find the joint cannot be connected to your vehicle, please use the proper adaptng joint supplied (pic N) in the workbag to connect onto.
- Please replace the brake pads when a minimum of 3mm of pad material is left on the pad. Please replace the brake disc when a minimum of 30.5mm of brake disc is left.
- Do not use SILICONE brake fluid.
- This product is specially designed for racing and particular use and cannot be used for street. You are required to change the stock wheels to aftermarket ones, if there is interference between the caliper and the wheel under some circumstances.
Warranty
Warranty includes any fault in production. After our examination, it shows that most brake systems’ problems (failures) result not from production fault, but from consumers’ misuse or improper installation. Any warranty claim is subject to our examination results. The warranty is void if:
- The disc face shows blue/purple marks, meaning overheating.
- Brake discs crack owing to misuse or braking at high speed.
- While you are washing the car or the car is wading through water, brake systems under high temperature get wet, which will lead to deformation of brake discs and vibration.
- Soft sharp noise.
- Overuse of brake, and excessive wear of brake pads and brake discs.
All costs of transportation are born by the customer when the products are sent back to the original manufacturer for overhaul during its warranty period. After our examination, no matter if the responsibility (who leads to the failure in the product) comes from the buyer or seller, the manufacturer (the seller) is responsible for sending the product back to the buyer by sea transportation.
During the maintenance period, if it inconveniences you not to have your car driven, the warranty does not cover this part.
Caution
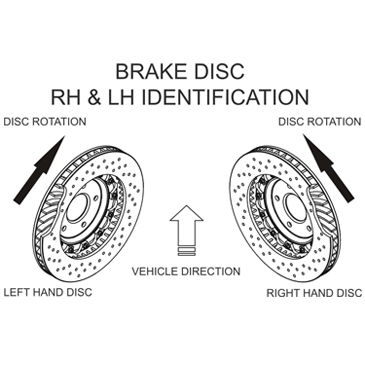
- When fitting the caliper on the vehicle, please pay attention to a sticker on the caliper. The direction of the arrow must be exactly the same as the tire rotation.
- In some circumstances, the caliper can be modified to be fit to the vehicles. Or the position where the caliper is fit is not exactly the same in every country.
- Once the direction of the caliper is not correct; you could change the positions of the bleed nipples (NO.4) and the pipeline (copper material) to ensure the correct direction.
- There is an arrow in the anti-rattle clip (NO.1), please have the arrow headed toward the tire rotation.
Installation Instructions
- Please raise the car and remove the OE brake caliper and the brake disc.
- Use emery paper to clean the brake disc mounting faces (pic A) or use a blade to remove rust and then make sure all faces of the brake disc mounting are clean.
- The antirust grease spreads over the brake disc when the product leaves the manufacturer. Please clean oil sludge on the surface of it for fear of permeating the grease into the brake pads, in order to avoid causing unusual noise and a peculiar smell
- Afterwards, please fit the brake disc in the car and ensure the central point of the brake disc and that of the brake disc mounting match (pic B and pic C).
- The new caliper mounting bracket needs to be bolted to the location points on the OE caliper mounting bracket and then all bolts must be tightened by using recommended torques. Please note the length of the bolts and spec. for thread must be proper. (pic D)
- Bolt the brake caliper to the caliper mounting bracket.
- Measure the distance on all sides between the 2 brake pads and the brake disc.
- Due to the fact that location points on the OE caliper mounting bracket have tolerance, please check whether the brake disc is central in the caliper pathway. If not, realign the brake caliper and the brake disc to the optimum position by putting the washer that is 0.25m/m between the caliper and the caliper mounting bracket, or between the caliper mounting bracket and the hub. (pic E and pic F). Please note that 2 washers at most can be stacked off one bolt and two bolts should be fit.
- The brake disc should be flush with the brake disc mounting before the measurement of the relative distances between the brake caliper, the brake disc and the caliper mounting bracket are taken.
- The bleed nipples must be located at the top of the brake caliper when it is fitted to the vehicle.
- Please note the washer should be put onto the banjos (pic G) and tightened when the brake hydraulic hose is connected.
- Connect the brake hydraulic hose to the vehicle and tighten it.
- The method of fixing the brake hydraulic hose attached to the hub is not exactly the same as where the OE location has been provided. The tool bag has long fixing strips. The technician is able to alter the angle that is required. Upon completion of fitting, close the indentation iron strips by using the particular tools. (pic. P)
- The U-type strips supplied in the tool bag are used to fix the brake hydraulic hose. The U-type strips are not applicable for all vehicles; therefore, the technician can decide to fit it or not depending on the application.
- No matter how the technician fixes the brake hydraulic hose by any means, the technician should verify the brake hydraulic hose will not be affected by the hub direction or the shock absorbers stroke.
- The best working temperature of the brake pads is 50°C and the highest is 600°C (for rotor assembly). It's essential to get the vehicle driven for around 1-5 kilometers in either cold or snowy weather until the brake pads reach the standard temperature. This will bring the brake to its best performance.
- Tightening Torques Table
Part NumberTightening TorquesD90 NMG25 NMJ90 NMKFIXING-20NM;FLOATING-17 NML14 NMM17 NM
Trouble Shooting
- Fluid Leaking
- Please check if the joint of the brake hydraulic hose has any foreign bodies or wrong specification. (raised-type or concave-type)
- It is normal to see a small amount of oil sludge around bleed nipples. If obvious oil leaking is found, disassemble and cleanse the screws, then refit them.
- Brake systems must be sent back to the original manufacturer if piston has oil leaking resulting from excessive use of this product.
- Brake noise
- When you drive forward and brake, it will lead to a loud noise. When you reverse, it will also lead to a loud noise. Noise caused by both of the two above conditions result from the incomplete installation of anti-rattle clips.
- It is normal to hear soft sharp noise when you brake. Use anti-noise wax.
Warning!!
After finishing the installation, please measure the oscillate value of the rotor moving up and down and left and right when rotating it.
| The tolerance of oscillate value of rotor moving left and right cannot exceed 0.05mm. | 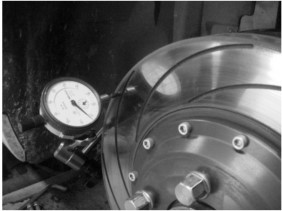 |
| The tolerance of oscillate value of rotor moving up and down cannot exceed 0.15mm. | 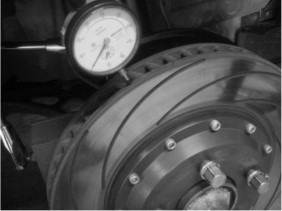 |